A Frank Discussion on In-Water Recompression

Decompression Illness (DCI), a medical diagnosis that encompasses both Decompression Sickness (DCS, aka “The Bends”) and Arterial Gas Embolism (AGE), is an unfortunate reality that cave divers may be forced to face. Inert gas stress, caused by deep dives and lengthy bottom times, coupled with the exertion of carrying heavy equipment to and from the water, puts cave divers at increased risk of a decompression related injury and it is important that we are well educated on how to identify and care for these maladies.

For several years, the accepted standard of care for DCI was to treat an individual with oxygen while transporting them to a recompression chamber for treatment. However, the Diver’s Alert Network organized a committee to review medical literature regarding triage and various first aid strategies for DCI, and at the 2017 Undersea and Hyperbaric Medical Society Annual Meeting, a workshop was convened to discuss and review the data. The consensus of the committee members was released in March 2018 in the journal Diving and Hyperbaric Medicine, Vol. 48, Issue 1. In that article is the following statement:

Recompression and hyperbaric oxygen administered in a recompression chamber is acknowledged as the gold standard of care for DCI. However, in locations without ready access to a suitable hyperbaric chamber facility, and if symptoms are significant or progressing, in-water recompression using oxygen is an option. This is only appropriate where groups of divers (including the ‘patient’) have prior relevant training that imparts an understanding of related risks and facilitates a collective acceptance of responsibility for the decision to proceed.[1]

In plain English, the consensus of the committee was that as long certain criteria are met, the use of In-Water Recompression (IWR) as a first aid treatment of DCI may be appropriate. This article aims to review the process to decide whether or not IWR is appropriate, list the criteria that must be met before IWR should be considered, and outline two accepted IWR protocols. However, while it is the intention of this article to introduce an individual to IWR, it is not meant to replace training. Specifically, this article is not a substitute for the training of delivery and use of oxygen underwater (“aka advanced nitrox”), or training in In-Water Recompression.

Deciding if IWR is Appropriate

Categorization and diagnosis of DCI should only be made by a diving medicine physician, and divers should have contact details for communicating with EMS. In the United States, local EMS may be contacted by calling 911, and the Divers Alert Network may be contacted by calling +1-919-684-9111. Triage by telephone with a diving medicine physician at DAN should be used to help categorize a case of DCI as mild or severe.

Mild signs and symptoms of DCI include:

  • Fatigue
  • Joint and limb pain (note: girdle/trunk pain is suggestive of spinal involvement and does not fall under the classification of limb pain)
  • Skin rash
  • Subcutaneous (lymphatic) swelling (subcutaneous swelling was added to the definition of mild DCI for several reasons, please see the journal article for the full discussion, however it is noted that the value of recompression treatment for lymphatic DCI, while unknown, is not obvious)

Although mild cases of DCI do not necessarily warrant IWR, there may be some benefit and it should be relatively safe to proceed as long as the criteria needed to engage the IWR protocol are met.

Severe cases of DCI may have neurological symptoms similar to what you may see in a stroke victim, including:

  • Numbness and tingling, including in the hands and feet
  • Sensory loss, including loss of hearing, smell, and vision
  • Slurred speech, including drooping features in the face
  • Paralysis and unconsciousness

Additional symptoms of severe DCI may also include:

  • Dizziness and nausea, potentially from an inner ear bend
  • Respiratory distress and trouble breathing, potentially from bubbles overwhelming the heart and lungs
  • Girdle (torso/trunk) pain, potentially indicating a spinal bend

In cases of severe DCI, IWR may be warranted if there is no ready access to a recompression chamber, and all of the criteria to proceed with IWR are in place. However, there are some contraindications that will preclude the use of IWR. To be blunt, IWR should never be considered if any of the following are occurring in the victim:

  • Hearing loss / vertigo / vomiting – this indicates a possible inner ear bend, which could result in nausea and vomiting, which could result in a choking or drowning hazard. Return to water would be unsafe.
  • Change in consciousness / shock / physical incapacitation – return to water would be unsafe.
  • Respiratory distress – return to water would be unsafe.
  • Preceding Oxygen Toxicity event – elevated risk of recurrence of Oxygen Toxicity / convulsions / drowning, return to water would be unsafe.
  • Diver is unwilling to return for IWR.

Criteria that must be met to proceed with IWR

Assuming that a group has decided it is appropriate to use IWR as first aid for a specific case of DCI, certain criteria must be met before proceeding with the procedure.

A team consisting of, at a minimum, three individuals, should be assembled. The team includes the victim, an in-water tender that will accompany and monitor the victim throughout the IWR protocol, and a surface supervisor. Ideally, there should be a fourth team member that can assist the in-water tender and relay information to/from surface personnel.

Because of the elevated risk of CNS oxygen toxicity from PO2 exposures up to 1.9 BAR, all members of the team should be properly trained and practiced in decompression procedures using 100% oxygen. Specifically, they should understand the risks of, and how to identify the symptoms associated with, CNS oxygen toxicity, and how to properly deal with a convulsion.

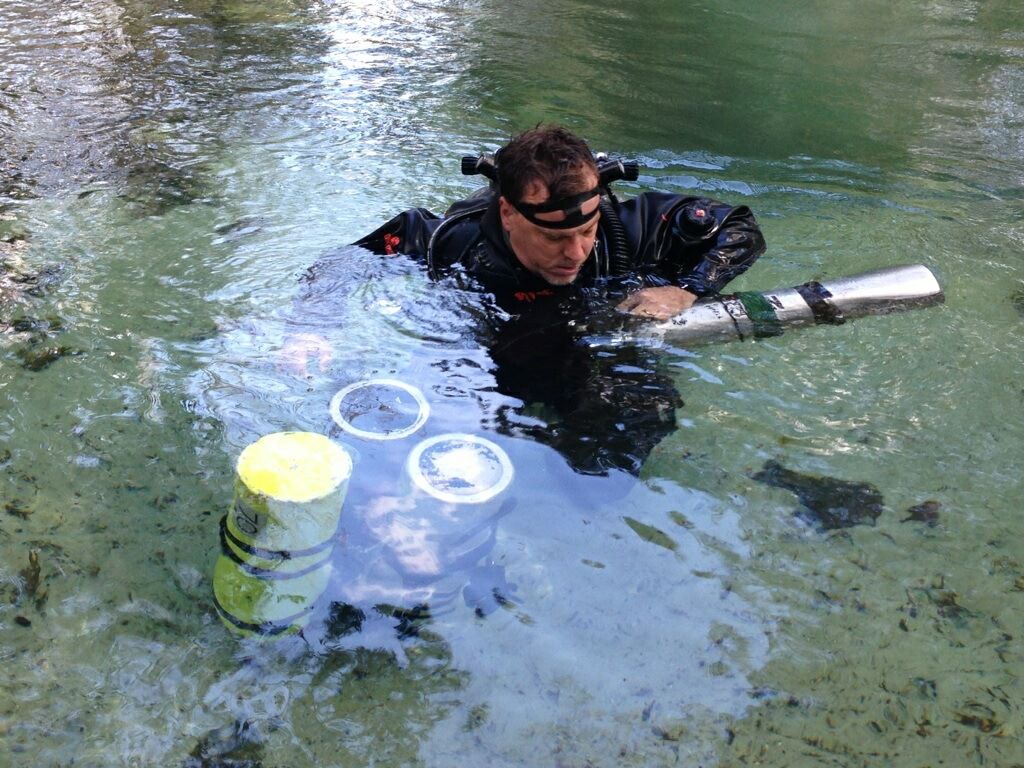
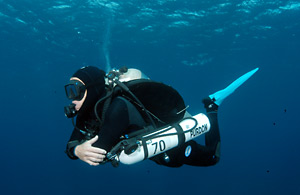
The team must have the appropriate equipment for IWR using oxygen. Because cold divers do not decompress efficiently, the diver should have adequate thermal protection that could keep them warm up to four additional hours in the water. The team must also have sufficient oxygen for both the in-water and surface portion of the treatment; at a bare minimum, a team performing IWR on open-circuit scuba should be prepared with 120 cubic feet of oxygen.

The team must have a method to maintain a stable depth for each of the stops, including the slow ascents during stops. A down-line would be very helpful for the ascents between stops.

Finally, the team must have a method of communication (wet-notes/slate).

It is also strongly recommended that the injured diver use a full-face mask, or mouthpiece retaining device, throughout the procedure. However, under no circumstances should divers that have never used a full-face mask use their IWR session as a time to learn new skills — stick with equipment that you use regularly and are familiar with already.

Because the use of breathing gases other than oxygen for IWR is not recommended, IWR should only be accomplished with the patient breathing 100% oxygen. During an IWR procedure, a maximum depth of 30fsw (9msw), should be observed.

Under no circumstances should an individual ever breathe oxygen below 30fsw (9msw) while underwater.

Finally, the entire team must be willing to accept the chance that IWR may not result in complete resolution of DCI, and may in fact cause additional complications due to the exposures to high PO2’s.

Two IWR Protocols

The Wikipedia article on “In-Water Recompression”[2] lists five in-water recompression protocols. Three of the protocols outlined on the Wikipedia page include initial deep spikes to compress bubbles, followed by a gradual ascent to 30fsw (9msw). However, at a TEKDive USA 2018 presentation on IWR, David Doolette discussed that recent data indicates that the efficacy of the deep spike was questionable, and so I will only cover the Australian and US Navy In-Water Recompression protocols here.

Australian Protocol

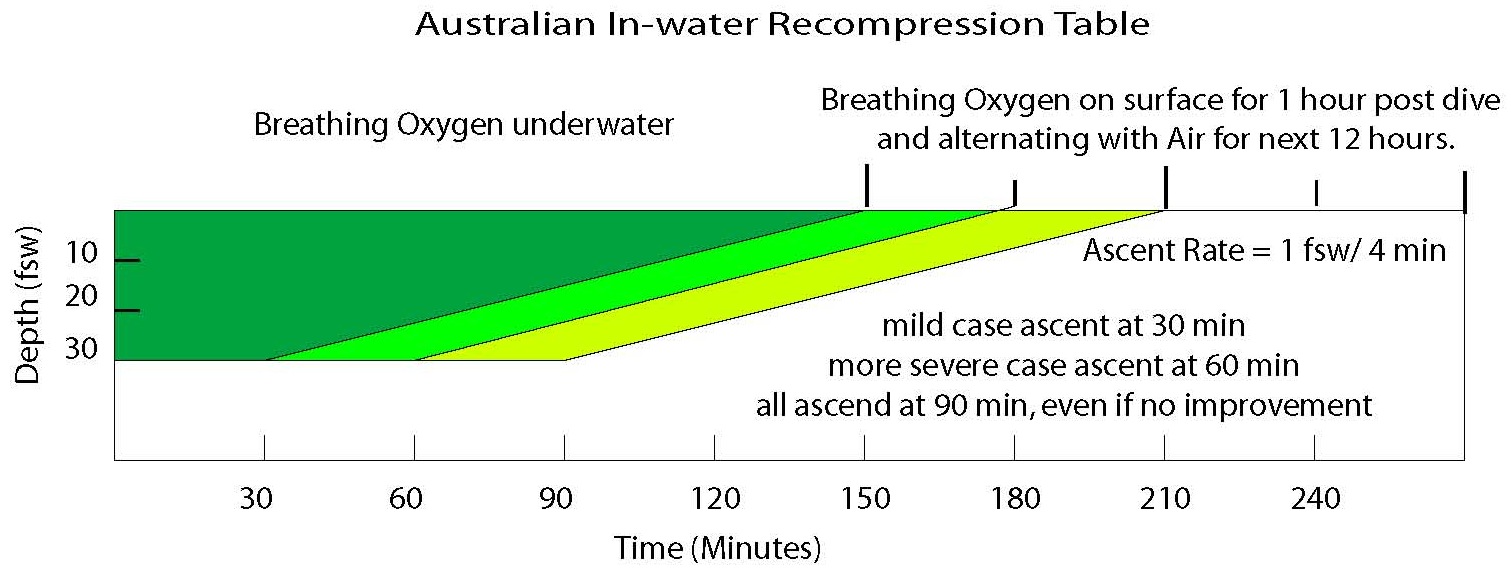
The Australian Method was developed by the Australian Royal Navy and was first published in the Journal of South Pacific Underwater Medicine Society in 1979.[3] Under this protocol, oxygen is supplied at a maximum depth of 30fsw (9msw). In mild cases, ascent to the surface can begin after 30 minutes. In severe cases, ascent can begin after 60 minutes if significant improvement has occurred, but if there has been no improvement in significant cases, the time at 30fsw can be extended by 30 minutes to a maximum time of 90 minutes.

During ascent to the surface, the diver remains on oxygen and maintains an ascent rate of 12 minutes per meter (roughly 4 minutes per foot). Once surfacing, the diver alternates between breathing oxygen and air at 1-hour intervals for the next twelve hours.

Total in-water treatment time via the Australian method ranges from a minimum of 150 minutes to a maximum in-water time of 210 minutes.

US Navy Protocol


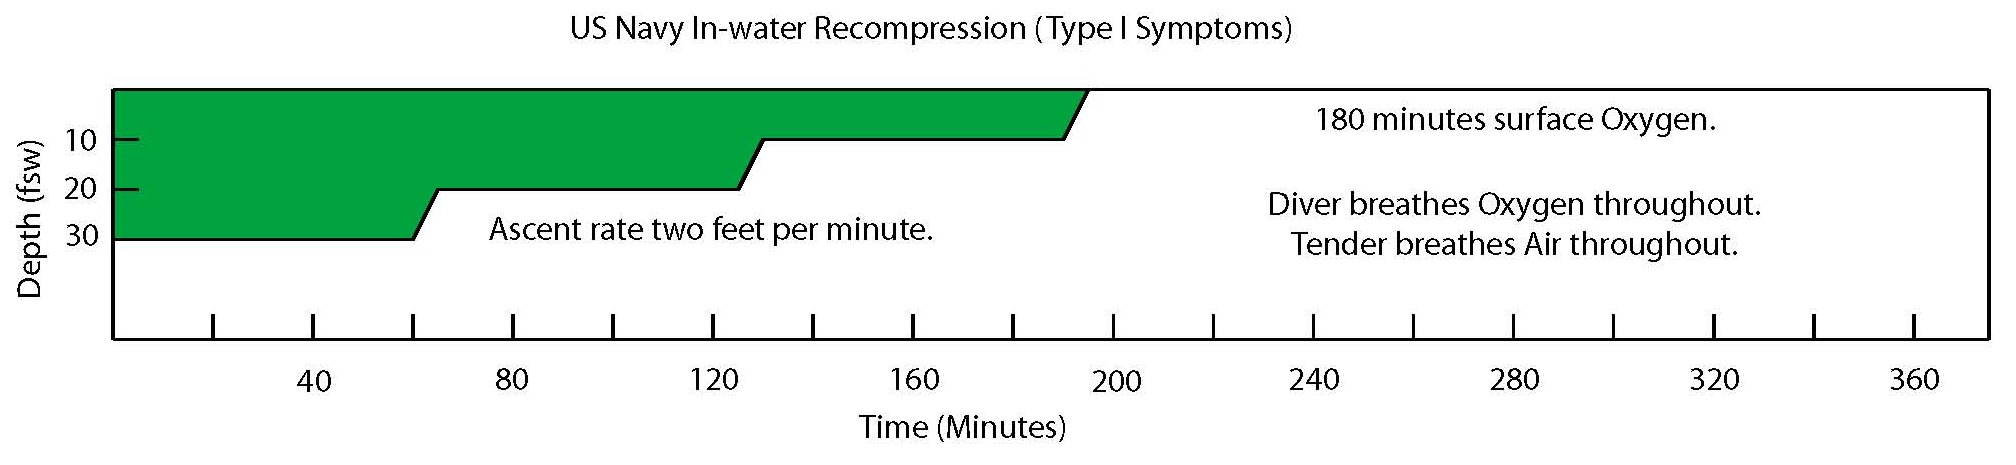
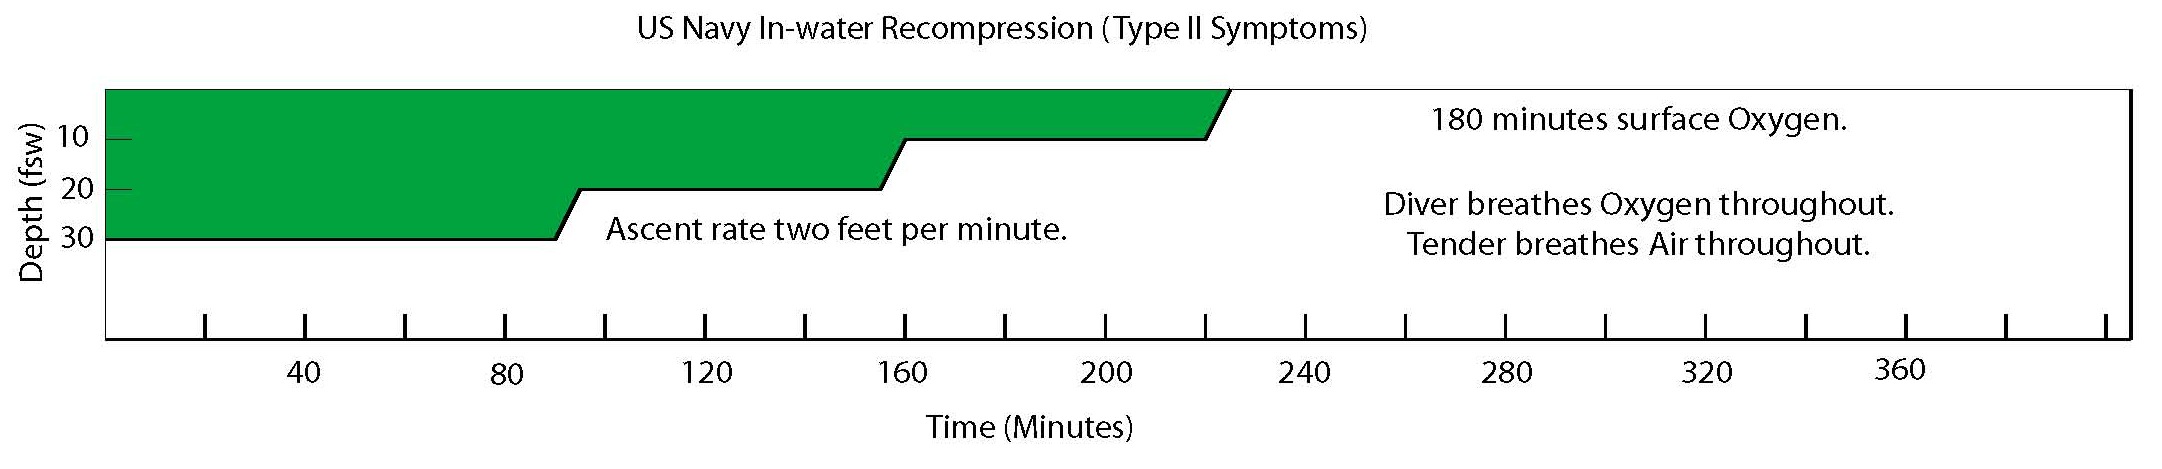
The US Navy developed two IWR treatment tables that are published in the US Navy Diving Manual.[4] The table used depends on the symptoms diagnosed by the medical officer, either Type I (mild) or Type II DCS (severe).

In both tables, the treatment begins at a depth of 30fsw (9msw) with pure oxygen. For mild cases of DCI, an ascent to 20fsw (6msw) begins after 60 minutes, but in severe cases, ascent begins after 90 minutes. After leaving the 30fsw (9msw) stop, the diver ascends to 20fsw (6msw) where the diver will stay on oxygen for 60 minutes before ascending to 10fsw (3msw). Once arriving at 10fsw (3msw), the diver will stay on oxygen for another 60 minutes before making their final ascent to the surface.

The ascent rate between each stop, 30fsw->20fsw, 20fsw->10fsw, and 10fsw->surface is a consistent 2fsw (0.6msw) per minute. Each ascent between stops should take 5 minutes to complete.

When the diver surfaces, they must remain on surface oxygen for 3 hours.

In-water time for the US Navy method ranges from 190 to 220 minutes.

Modifications to the protocols

Both the Australian and US Navy methods were derived to provide treatment for young, physically fit, active, military divers and if you believe you fit the mold, you may find these protocols suitable for use without modification. However, for the benefit of the rest of us, I believe slight modifications to the protocols are worth discussion.

Neither protocol allows for back-gas breaks from oxygen throughout the in-water portion entire procedure. Personally, if I were to use IWR to treat an injury to myself, I would take periodic gas back breaks that align with the same procedure I use during standard oxygen decompression, extending the treatment time accordingly to account for the breaks. For example, if the protocol that I use for back gas breaks calls for a 5-minute break after every 15 minutes on oxygen, a 60-minute stop would be extended by 20 minutes. That schedule would look something like this:

Description Gas Being Breathed Time Remaining
Start Start on Oxygen 60
15 minutes “On” Oxygen 45
5 minutes “Break” Air 45
15 minutes “On” Oxygen 30
5 minutes “Break” Air 30
15 minutes “On” Oxygen 15
5 minutes “Break” Air 15
15 minutes “On” Oxygen 0

Other Protocols

Within the past three years, an article surfaced at several places on the internet, including online diving magazines and a training agency blog. That article recommends descending to a maximum depth of 60fsw (18msw) to begin breathing oxygen while following a US Navy Treatment Schedule 5. I only mention this article because it was fairly wide-spread on the internet, but it is my opinion the article is irresponsible and anyone breathing pure oxygen below 30fsw (9msw) is foolish. Members of the Duke Diving Medicine Team posted the following statement on-line at ScubaBoard, and I believe it is worth quoting here:

The procedure and recompression profile advocated in the article place a diver at grave risk of serious injury or death and should not be attempted. Treatment Table 5 is designed for use in a hyperbaric chamber, not for in-water recompression. For a number of reasons, divers under water are at much higher risk of CNS oxygen toxicity than patients in a hyperbaric chamber, and a TT5 exposes divers to an inspired partial pressure of O2 of 2.82 ATA, far higher than the generally accepted safe immersed exposure limits of 1.3-1.6 ATA. The consequences of a seizure under water while breathing from an open-circuit regulator are obvious, and the article only mentions a full-face mask as a consideration, not a must.[5]

I agree with Duke Diving Medicine and believe nothing more needs be said on this dangerous practice.

In Conclusion

In summary, while IWR may not be suitable for all cases of DCI, it may be an incredibly useful arrow to have in any cave divers quiver. Obviously, the best choice is to get a diver to a proper hyperbaric facility for treatment, but there may be times that this is impractical, if not impossible. The deeply personal decision on whether or not to engage in IWR as a first aid treatment for DCI should only be made after proper categorization of the DCI event has been made by a medical physician, all of the equipment necessary to complete the procedure, including adequate amounts of personnel and oxygen, are assembled, and everyone on the team accepts the risks that are associated with breathing hyperbaric oxygen under water. It should also be noted that there is not a doctor on the planet that will ever recommend IWR as a treatment option for a specific case of DCI, your team will have to make that decision on your own.

It was my goal to help educate you on the review process that must be made before deciding to use IWR, list the criteria that are necessary to begin IWR first aid treatment, and outline two accepted IWR protocols that have been published in several scientific journals. Divers that wish to continue to educate themselves on the subject of IWR may find the Rubicon Foundation Web-site a useful resource and should visit http://rubicon-foundation.org/in-water-recompression/ for more information.

References
[1] “Consensus Guideline: Pre-hospital management of decompression illness: expert review of key principles and controversies.” Mitchell, SJ, et. al. Diving and Hyperbaric Medicine. Vol. 48, Issue 1. pp45-55. http://www.dhmjournal.com/images/ImmediateRelease/Mitchell_DCI-workshop.pdf

[2] In-Water Recompression, Wikipedia Article referenced on April 30, 2018. https://en.wikipedia.org/wiki/In-water_recompression

[3] “Underwater Oxygen Treatment of decompression sickness.” Edmonds, Carl. Journal of South Pacific Underwater Medicine Society, referenced from Rubicon Research Repository on April 30, 2018. http://archive.rubicon-foundation.org/xmlui/bitstream/handle/123456789/6221/SPUMS_V9N1_5.pdf?sequence=1

[4] US Navy Diving Manual, Revision 7, Section 17-5.4.2, “In-Water Recompression.” Referenced on April 30, 2018. http://www.navsea.navy.mil/Portals/103/Documents/SUPSALV/Diving/US%20DIVING%20MANUAL_REV7.pdf?ver=2017-01-11-102354-393

[5] ScubaBoard Post on IWR, referenced on April 30, 2018. https://www.scubaboard.com/community/threads/in-water-recompression-revisited.539074/

Thoughts on cave training

For years, there has been a myth that the best divers in the world are cave divers. In support of that myth, perhaps you have heard that the hallmark of a cave diver is to have incredible buoyancy control, the ability to move through a narrow passage without disturbing the least bit of silt, and the ability to remain calm while facing the most stressful situations.

Back when I started cave diving there were pretty much two groups of people that took up the sport. The first group was made up of people that started out as divers that wanted to dive and explore the caves and springs in the area. The second group was made up of cavers that wanted to learn how to dive so they could continue exploring past sumps and partially flooded caves.

Every cave instructor that I knew who was teaching during this period was a highly skilled and dedicated cave diver, with years of teaching and cave diving experience behind them. One of the credos of cave instruction was that cave instructors did not try and encourage people to take up the sport, but would steer individuals toward training when those individuals expressed a strong desire to pursue the activity. When discussing the training, instructors focused on the safety aspects of the program rather than selling the sport for other reasons.

With the growth of internet forums, including rec.scuba and eventually sites such as ScubaBoard, the stories about cave divers being the best in the world started to grow. As the stories of how great cave divers were, demand for cave instruction increased, and we saw an increase in cave instructors to meet the demand. Some instructors began actively promoting cave training to recruit more students.

Unfortunately, this does not always serve the best interests of the students enrolled in these courses, and to my chagrin, I am sure that some people have been encouraged to continue cave training even though they have no business doing so. Because the dangers in cave diving including a risk of death due to failure to perform, some people simply have no business taking up the activity. Cave instructors have a moral obligation to discourage some people from pursuing the sport.

Hopefully, every cave diver you ever meet does have incredible buoyancy control, great anti-silt technique, ice water in their veins, and are some of the best divers you will have the pleasure to dive with. But that does not mean you need to become a cave diver to be a great diver yourself. If you live thousands of miles away from flooded caves, and are not drawn to see the cave environment, then you really do not need to take up cave diving. You can develop great buoyancy control, anti-silt technique, and a calm cool demeanor without ever going into an overhead environment if you just put the effort into it.

Always check your gas!

I recently heard a story that happened to a good friend and it compelled me to write this article. My friend was doing a dive on his CCR and everything went flawlessly on the dive. I wish I could say that the story ended there, because I would have not spent the time putting together this article, but it doesn’t. When he got back to deco and was sitting at 20’, he could not get his PO2 above 0.9. Even doing multiple oxygen flushes did nothing to help the problem.

For non-rebreather divers, performing an O2 flush involves venting all of the gas in the breathing loop, and holding down the oxygen addition button to re-fill the loop with pure O2. When you’re sitting at 20’, performing an O2 flush should spike the PO2 output up to 1.6, but here he was stuck with a reading of 0.9. This could have been caused by a number of things, the most likely being either bad oxygen cells, or something like gas contamination.

During rebreather training we’re taught “when in doubt, bail out” and I’m glad to say that my friend bailed out to open circuit, finished his decompression and his story has a happy ending. During the post-dive analysis of his gear he identified the cause of the problem; in his haste to set up, he never analyzed the oxygen supply for his rebreather, and what was supposed to be pure O2 was in reality only 50% nitrox.

While forgetting to analyze his gas was a non-event for this friend, I knew two other people that were not so lucky due to cylinder marking and gas analysis, and two that were just wrong.

Bobby
It was the summer of 1995, and the Technical Diving Revolution was in full swing when Bobby McGuire drowned. Although I only met him once or twice, by all accounts he was a heck of a diver and a heck of a nice guy too.

He was doing a 150’ deep cave dive, and his dive plan called for using a stage bottle filled with 25% nitrox on the bottom, and a stage bottle of 50% nitrox for decompression from 70’ to 20’. Stage bottles are an additional aluminum 80 cylinder with a working first stage, second stage, and pressure gauge, that is carried by the diver to provide additional breathing gas. Typically, the bottles are carried underneath a divers body. Frequently, divers will put different breathing gas, such as oxygen or 50% nitrox, in a stage bottle to speed up decompression.

rhea-cayman_stage219

Because he planned to use one bottle at one point of the dive, and the other at another point in the dive, he labeled the stage bottles “1” and “2”.

Bad Analysis Marking

During the dive, Bobby picked the wrong bottle to breathe from and he breathed 50% nitrox at 150’. Being under 5.5 ATA of pressure, this gave him a PO2 of almost 2.8 – double the recommended maximum recreational limit of 1.4! At some point during the ascent, Bobby suffered a grand mal seizure from CNS oxygen toxicity, and because he spit out his regulator during the seizure, he drowned.

What should Bobby have done differently?

Although I do not know for sure what Bobby was thinking when he labeled his tanks, my best guess is that he marked them the way he did because he would use cylinder “1” on the first portion of the dive and “2” on the second portion.

As hard to believe as this incident sounds, back in the early 90s, tank labelling and marking were not universally standardized and the reasoning that led to his tanks being labeled this way is understandable given the accepted norms at the time. It took several incidents, including Bobby’s, to make technical divers come to a consensus on how to label Nitrox tanks. If he had taken a different approach to marking his stage bottles, there’s a strong likelihood that he would be alive today.

The best method for labeling stage bottles that I can think of is the one adopted by the WKPP and other people. It’s simple and allows for both self-checking and buddy verification. There are two components of this stage bottle marking technique.

The first component is to place in a location that the diver can read, on the cylinder neck, a piece of tape with the cylinder gas analysis in big numbers. You should also put the date of the analysis, your initials, and the MOD on the tape. I typically carry the gas analysis out to the 1/10th of a percent, but given that our oxygen sensors are only good to within ± 1%, that may be overkill.

Analysis Marking

The second step is to place a label with the MOD on either side of the cylinder, horizontally in such a fashion that everyone on the team can read it. There should be nothing except the MOD on these labels, the only exception is pure oxygen, which should simply read “oxygen” so that it is not misread at an inappropriate depth, such as 120’.

Most divers using this strategy will find themselves dedicating a few cylinders to certain depths, and attaching permanent MOD stickers. The most common depths include 190’ (either 18/45 or 21/35), 120’ (usually 30/30 or 32%), 70’ (50%) and Oxygen, and permanent labels can be found for those depths at many dive shops. If you decide not to dedicate a cylinder for a specific depth, you should at the very least use a piece of duct tape and label the MOD for the gas that is in the cylinder in this fashion.

MOD Markings

Remember, the key with the MOD marking is that everyone on your dive team should be able to visually see what gas you are breathing quickly, so both sides of the bottle need to be labeled. Some people have recently adopted the practice of placing a third MOD label on the bottom of the cylinder in such a manner that a diver following behind can also see the MOD.

MOD4

Jonathan
I was introduced to Jonathan Gol in 1997, and he and I did about a dozen dives between 1998 and 2000. In November 2001, after recovering from a prolonged viral infection, he decided to go on a dive in Jackson Blue Spring. When he got to his 20’ decompression stop, he switched to an aluminum 40 that he normally kept filled with oxygen for decompression, and he was dead within a minute.

Although we do not know for sure what events transpired before he died, we have a theory and it is a pretty good theory. He made two fatal mistakes that cost him his life and what happened is a lesson that we should all learn from.

His first fatal mistake happened a couple of months before his death. Jonathan was a home blender and usually had several helium bottles at his house that he rented from a local gas supplier. When he became sick with the viral infection, he decided he did not want to pay the monthly rental on the helium cylinders and he used his Haskel to fill an aluminum 40 with the helium from those bottles before returning them.

His second fatal mistake happened the day he died. Once he was medically cleared to dive, he packed up his truck and drove the ten hours from Houston to Marianna. In his haste, he did not analyze the tank that should have had pure oxygen in it. The cylinder label said “100%,” but in reality, it was 100% helium and not oxygen. Being anoxic, it was incapable of supporting life. He died as a result.

What should Jonathan have done differently?

The first thing that he should have done differently was not to fill a tank dedicated to one gas with something else. Once a cylinder is dedicated to a gas, i.e. it is labeled permanently for that gas, you should NEVER fill it with anything else. If it’s an oxygen bottle, it should only get oxygen. Period. Ditto for 50% (70’), 32% (120’), etc.

And then the most important thing he should have done differently was that he should have VERIFIED the contents of the gas before he put a regulator on the tank.

A lot of people dislike analyzing their cylinders at the dive site because of the effort it takes to do it correctly, but do you see what I wrote in the paragraph above? I used the word VERIFIED, not “analyzed.”

You should analyze your tanks whenever you fill them at the shop, and label them as I described in the section about Bobby. However, you only need to VERIFY them whenever you are about to put a regulator on them.

The difference is simple: to properly analyze a tank you need to use a flow meter and calibrate your sensor with a known gas (typically air). These things take a little bit of time, and most of us “normal humans” dislike the extra time it takes to do a proper gas analysis in the field and so we won’t do it.

However, VERIFYING the contents is very quick and can be as easy as holding the sensor face into the flow. The oxygen reading will likely be off by as much as 3%, but the purpose of this step is to confirm that the gas is what you are expecting and not wildly off the mark. It only takes a few seconds to do, and if the gas is wildly off then you can do a more time consuming analysis to find out exactly what is in those cylinders.

Dirty Analysis

If Jonathan had done this simple check, he would have quickly seen that his “oxygen” bottle did not have oxygen in it. This step would have only cost him 10 seconds, rather than the cost he paid by skipping it.

Sadly, Jonathan’s story was not unique, and as recently as 2013 there was an oxygen toxicity evet that took a divers life under a similar set of circumstances (dedicated bottle, no verification).

You don’t always know what you think you know…
In 2013 I found myself teaching a decompression procedures course to a couple of guys that worked at a scientific program which had a fill station. The program had several sets of doubles for use in pool training, and they each checked out a set of doubles from their dive locker. In their minds, because their fill station was incapable of pumping anything but air, and those doubles were reserved for pool use only, they should only have had air. Nothing else.

As they were assembling the gear for the first dive of the course, I asked them to analyze their tanks. They both laughed and said “why are you making us do this, these have air!”

Travis went first. He put my analyzer on his set of doubles, and it quickly read 28%. He told me, “I think something’s wrong with your analyzer, it’s reading 28%!”

I verified the analyzer on a set of my tanks, and handed it back to him. “Check it again,” I said, and once again, it read 28%.

We then handed the analyzer over to Ian, and his doubles read 29%.

“There’s no way!” he said, but he analyzed them again and got the same reading a second time.

A week later the mystery was solved. It turns out that someone else from the same program had checked out multiple sets of doubles, and filled at a local dive shop with nitrox so they could go cave diving. Figuring that the tanks would never be used except in the pool, the culprit failed to label them.

What if someone else made the same assumption as Travis and Ian and checked out a set of doubles to do a deep wreck dive, such as the Hydroatlantic (175’ to the sand)? That could have gone bad really quick.

The lesson here is that just because you think you know what is in your tanks and what you are filling them with, that does not mean you are correct and you still need to analyze and verify your tanks.

Even when getting fills from a “dedicated nitrox fill station,” you should take the time to analyze your tanks. I cannot believe how many times I’ve seen people say “I don’t need to analyze my tanks, I got them filled at <insert dive shop name here> and they always fill 32%!” and that kind of laziness needs to stop.

A few simple rules
My friend is a very experienced diver, and he knew better than to dive a tank that hadn’t been properly analyzed. However, we are all only human and sometimes we get a little complacent and skip our simple checks. But when playing around with gasses and diving, we need to keep on our toes. In summary, here are a few simple rules to follow:

1. Always analyze and label your cylinders when you get them filled. Label them with both the gas content on the neck in a place easily visible by the diver, and MOD on the sides in such a way that everyone on the dive team can see it.
2. Never fill a dedicated cylinder with something other than the correct gas. If you do, it’s no longer a dedicated cylinder.
3. Always VERIFY the contents of your cylinders before putting a regulator on it. This step takes only a few seconds, and can save you your life.

Mending a broken heart (or how I found out I had a PFO)

Over the past five years I got used to getting bent.

A lot.

I really mean a lot.

I never really thought much about how frequently I got bent, I just sort of took it for granted that I would get some form of DCS every now and then.

Skin bends? Yup, that one was pretty common. Itching, rashes, those were pretty frequent occurrences. I probably got a case of skin bends on one out of ten cave dives, and I just considered it one of those things that I had to contend with if I wanted to keep doing longer dives.

Joint pain? Those were rare, but I had a couple of them too.

My first “type 1” hit was in my elbow back in 1994. A friend of mine and I tried to do a swimming stage dive to the well at Little River. We were in wetsuits, and diving air. We were young and dumb. Diving air meant a lot of decompression, and I was cold while waiting for my computer to clear.

After that dive, my elbow felt like someone had tried to hammer a railroad spike into it.

It hurt.

A lot.

My wife fell off of a horse that day. We spent the evening cuddled in bed, icing our injuries and chewing down Advil.

Oddly enough, I did hundreds of dives without getting bent, and I never got bent on a “recreational” profile.

Between 1994 and 2001 I did hundreds of deep and long cave dives, and only got bent about once a year. Although one of the hits was bad enough that I spent a weekend in Tallahassee Community Hospital at the chamber, I really didn’t think much about it because it was well within the realm of what my friends were also experiencing on some of our dives. We were experimenting on ourselves with different decompression profiles, and my experience were not that unusual. But something happened during my break from cave diving, and when I came back I started getting bent regularly.

As I said, the common one was skin bends. I was averaging about one hit a month, and just grew to accept it as normal.

However, in spring 2014, that changed for the worse.

I took a type 2 (CNS) decompression hit after a four-hour dive in Indian Springs. The profile was nothing really absurd, but about two hours after the dive, I was drooling in my dinner.

No Bueno.

I wasn’t sure what was going on with me, but suspected I had a PFO.

For those of you unfamiliar with the term, a Patent Foramen Ovale, or PFO, is a hole between the right and left atria of the heart. This shunt in the heart allows blood to by-pass the lungs, and continue circulating throughout the body. Every person has a PFO while they are in their mothers’ womb, but they usually close shortly after birth.

atrial-septal-defect

It is estimated that 25%-30% of the general population have a PFO that failed to close. In some people, the PFO is closed the majority of the time, but can open when under certain physiological strain (walking a set of heavy gear out of the water, Valsalva maneuver, bearing down like you’re trying to go poop).

What a PFO means to a diver is that as the diver is off-gassing (decompressing) from a dive, blood that is rich with inert gas micro-bubbles may potentially by-pass the lungs and pass into arterial circulation. As the diver ascends, there is a potential for the bubbles to expand into bigger bubbles, and cause decompression illness.

And for non-divers, a PFO can mean an increase in risk for stroke.

But the idea that I had a PFO did not make much sense to me. As I said, I had done a lot of deep diving and been a very active diver.

Aside from a dissection of the heart, there are only three tests available to determine if an individual has a PFO, and I tested negative on the “gold standard” test back in 1998.

The tests are:

  • Transthoracic echocardiogram (TTE). It is the most common type of echocardiogram, and is entirely non-invasive. A technician injects a saline contrast with bubbles in it while monitoring to see if they pass through a PFO with an ultrasonic transducer. The probe is placed against the rib-cage on the outside of the body. This test is not considered very reliable because of the potential for it to miss a small hole due to the probe being external to the body.
  • Transesophageal echocardiogram (TEE). This test involves a probe being inserted into your esophagus, and usually the patient has to be under mild sedation. A saline solution with bubbles is injected into the blood stream while actively being monitored by the probe. This test had been considered the “gold standard” for a PFO test for many years.
  • Transcranial Doppler (TCD). Recently, this test has become more widely accepted as a way of identifying a PFO. A probe is placed on the outside of the skull while a saline solution with bubbles is injected in the body. It is completely non-invasive.

In 1998, after an incident that caused me to spend a weekend in a hospital doing chamber rides, I underwent a TEE. I tested negative on that test, and just assumed I was in the clear. But, after the hit in 2014, and the frequency of skin bends on decompression dives, I began to have doubts.

After a consultation, my GP referred me to a cardiologist. The cardiologist reviewed my case history, and having previously treated other divers with a PFO, decided to send me for a bubble study.

A week later I was in the clinic having a TTE – first the technician took an ultrasound of my heart without the saline contrast, then an ultrasound with the saline bubble solution to watch the flow through the heart to the lungs. Finally, it was time to test for a PFO; the technician ordered me to bear down and perform a deep Valsalva to try and get a PFO to open, and injected the bubble solution.

Eureka! She could see the bubbles shunting across my heart!

The cardiologist scheduled a follow-up for additional testing. He wanted for me to undergo a TEE to see if they can determine the size of the PFO.

Because the TEE requires mild sedation, the cardiologist wanted to have it performed in a hospital. Two weeks later I found myself in North Florida Regional Hospital’s cardiac wing to have the TEE.

The nursing staff at North Florida have a strange sense of humor. The conversations I had with several of them went something like this:

“My name is Joe, I’ll be your nurse today. What procedure are you having done?”

“TEE.”

“Oh, I’m so sorry. You don’t want to see a video of what they’re going to do you.”

Greeeat.

The surgeon that would ultimately repair my heart came in to talk to me, and he explained the steps in the TEE. He also told me they would administer a mild sedative to inhibit the gag reflex when they insert the probe down my throat.

Awesome.

A few minutes later, an attendant came in and administered a shot of propofol (the same stuff that killed Michael Jackson).

Nappy time.

The next thing that I remember is being woken up in the recovery room.

The doc came in and told me that I tested negative on the TEE. His speculation was that my PFO was small enough that I needed to do a deep Valsalva in order to trigger it to open, and that the propofol interfered with my ability to do that.

Ya’ think? I’ve since heard from one other person who also had a PFO closure, and she tested negative multiple times on the TEE. Hmm, gold standard?

He also decided to go ahead and schedule surgery to implant an Amplatzer Septal Occluder.

The septal occluder is essentially a wire mesh plug that gets inserted into the hole in the heart by a catheter. Your heart muscle then grows around the mesh and the PFO closes.

asd-closure-device-www-drsvenkatesan-com

As I was being discharged from the TEE, we scheduled the surgery to close my PFO for Friday, September 19th, 2014.

The week prior to the surgery I was pretty calm and collected, but the morning of the surgery I started to panic.

What if something went wrong?

What if I had a stroke, or worse, while on the operating table?

What if the surgery didn’t work and I still got bent like a pretzel?

In a nutshell, I was scared shitless. But in the month between verifying the PFO existed and that morning, I had spoken with several people who had undergone the procedure. Every single one of them spoke positively about the success of the procedure, and those conversations gave me the strength to continue.

The nurse came to prep me for surgery, and then about half-past 8 in the morning I was wheeled into the OR. This time there would be no anesthesia to knock me out, just a local so I would not feel the procedure.

Did I mention that the surgery involved a catheter inserted in my groin region? The room was cold, and I was conscious, and my junk was on full display for the world to see. The attendants prepped me and got me ready, and then my surgeon came into the room.

What happened next was a weird, surreal, experience. It must have been nerves, but I was talking like crazy and I carried on a conversation with the surgeon while he was probing and plumbing around, inserting tubes into my body, making his way to my heart.

We talked about family vacations, travels, and the like.

He talked about his kids, and I talked about my wife and our trips to the islands and my god kids. I also offered to teach his kids scuba (he hasn’t taken me up on it).

About ten minutes after he started, he announced he found and plugged the hole. He also told me it was one of the smaller ones he has ever had to close.

Viola!

I was wheeled out of the OR and brought to a recovery room. Because of the dual incisions, and the amount of blood thinners I had been given, they wanted me to lay flat on my back for several hours to let the wound close. A few hours post-op they asked me to sit up, but unfortunately I started to bleed. Luckily for me they got it under control, and I stopped bleeding.

That afternoon, probably around 2 or 3, the doc came in to talk to me and see how I was doing. He told me I was not allowed to dive for six weeks with no really deep diving for three months. He also said I was not allowed to run for a week, I was not allowed to lift anything heavy for four days, and warned me that I would probably have some bruising near my groin.

He wasn’t kidding about the bruising – two days after the surgery it looked like someone had taken a baseball bat to my psoas region. Oh and it was sore.

Regardless, recovery went well and I did quite a bit of walking after the first few days.

On Halloween Day I was cleared to dive again, and I started off with a bang by teaching a NAUI Cave 2 course. Every dive in a NAUI Cave 2 course is a stage dive, and we booked five days to do two stage dives a day – that’s a lot of bottom time.

I don’t think that was what the doc had in mind, but you might as well jump in with both feet.

I felt great after every one of those dives, but the true test would be on a deeper dive. However, I continued to do shallower, but progressively longer dives. I also co-taught a full cave class in early December, which was another five days of back to back to back dives.

Christmas break marked the three-month period, and I had the chance to really test the new, improved, bionic heart. I had an opportunity to go do a few dives at Eagles Nest and Diepolder III, and those dives would all be deeper than 250’ deep.

Time to spend some money on helium!

The first dive was at D3 and I remember getting back to deco and wondering if that dive was going to leave me bent. At one point I actually started to get tense – would I be sitting there scratching my swelling belly two hours after the dive, or would I feel normal and fine?

Well, the good news is that I was perfectly fine after the dive. Actually, I felt incredible. No problems what-so-ever. Eureka!

Fast forward to today. In the eighteen months since having the surgery, I’ve logged a little over 350 dives. I’ve also slowly bumped up my gradient factors, decreasing the conservatism in my diving.

An easy estimate is that over 200 dives since the surgery involved some form of staged decompression, and with all of the diving we did in Cathedral this past fall, at least 50 of them were deeper than 150’, including a couple of dives with 7 hour run-times (two with 3 hour-bottom times @150’). There have also been at least 20 dives deeper than 220’, with two just shy of 300’.

I’ve only had one minor incident out of those dives, and that was on a hot day where I humped a bunch of gear a long haul immediately after a four-hour dive.  That’s a far cry from where I used to be, and all in all I’d say the procedure was a huge success.

So….

If you find yourself getting weird skin bends, or other issues, you might consider getting checked for a PFO. And be sure to have multiple different tests done – the TEE can definitely have a FALSE NEGATIVE, so don’t rely only on one test. If you find out you do have a PFO, while I will tell you I had a positive experience, only you can decide if the risks associated with the surgery are worth it or not. I know people that have chosen to not take those risks, and they are living full productive lives.


Successful OW Checkout Dives for New Instructors

I originally wrote this article to help out a couple of new instructors at the UF scuba program. I am releasing it to the public for any other new instructor.

Successful OW Checkout Dives

By Ken Sallot

There’s a saying, “failure to plan is planning to fail.”  Given that scuba diving is a recreational activity that can be dangerous, or fatal, it’s important to be properly prepared to lead and conduct the open water student evaluations.  This article is not all encompassing, but will cover many of the key points necessary to have a successful session.  It is my hope that you can use it to help be prepared, and give you an opportunity to think about the types of scenarios you may encounter.

NAUI Requirements for Certification

NAUI requires every student to be evaluated through a minimum of four open water dives.  Prior to the standards update in December 2012, NAUI required a minimum of five open water dives, or four open water dives and a skin dive.  UF continues to use the five open water dives for their certification matrix.

Per NAUI standards, you may not conduct more than three dives on any given day.  If a third dive is to be conducted on a given day, you may not exceed 40’ for that dive, and you may not engage in any out-of-air ascent training exercises on that third dive.  This means you may not conduct alternate-air-ascents or controlled emergency swimming ascents on the third dive in a day.

To be counted as an open water dive, NAUI requires that you have one entry and one exit, and your underwater activity conducted while breathing scuba last for at least 20 minutes at a depth of at least fifteen feet.  If the conditions are unfavorable, you may have multiple entries and exits to achieve the minimum time.  To quote the NAUI S&P, “For example, an excursion involving an entry, 12 minutes of underwater activity on scuba, and an exit, followed by a later entry, eight minutes of underwater activity on scuba, and an exit would comprise one scuba dive.  A series of excursions in a course involving 80 minutes of underwater activity on scuba would comprise four scuba dives.”

The minimum SIT time between two dives is 10 minutes.

The student to instructor ratio is 8:1 in ideal conditions.  If you have a certified DM you may go up to 10:2, and if you have two DM’s you may go up to 12:3.  You may not expand the number beyond students no matter how many DM’s are with you.  If the conditions are less than ideal, such as poor visibility in a lake, high current, or rough seas, the ratios should be reduced.  The students are to be under DIRECT supervision of an instructor at all times, this means the instructor is in the water with the group and can halt any activity that could cause harm to the student.

Equipment considerations: You MUST have a snorkel.  The minimum equipment to be worn by students includes: mask, fins, snorkel, tank, regulator w/pressure gauge and octopus, bcd with low pressure inflator.  Instructors must have the same equipment PLUS a timing device, depth gauge, knife, emergency signaling device (whistle / mirror / smb).  A compass is required with visibility less than 10’.  And a quote from the S&P: “Instructors and dive leaders must also be similarly equipped as their students are during training, i.e., when students are using open circuit scuba, the instructor must also use open circuit scuba.” This means that if you are teaching students that will be using a single cylinder in a backmount configuration, then you must be wearing the same configuration (no doubles, no sidemount).

The skills a student must demonstrate in order to be certified include several “subjective” skills, such as being able to be a safe diver, responding correctly to signals, and properly using the buddy system.  It is worth spending a few minutes to review all of the required skills in your NAUI S&P.

Other skills that a student must demonstrate:

  • Orally inflate / deflate self and buddies BC
  • At the surface, remove and replace each of the following: mask, fins, weight belt, scuba unit.
  • With face submerged, breathe through snorkel while resting and swimming.
  • Self and buddy cramp releases
  • Safety stop
  • Mask clearing, including removal and replacement
  • Regulator recovery from behind the shoulder (“reach” method)
  • Hovering
  • Unclasp and adjust the weight belt underwater
  • Underwater navigation with a compass
  • Measure, record, and calculate individual air consumption as surface air consumption rate using a submersible pressure gauge, depth gauge, and timing device.
  • Perform a dive at a depth between 40 and 60’.
  • Use the NAUI tables to calculate repetitive dive information (LG, SIT credit, RNT)
  • Transport for a distance of at least 50 yards a budy who is simulating exhaustion.
  • From a minimum of 15’ share air and ascend in a controlled manner with another diver both as the donor and recipient.
  • Perform a relaxed, controlled, emergency swimming ascent (CESA) from a depth of at least 15’.
  • Bring a diver simulating unconsciousness to the surface from a depth of approximately 10’. Remove weight belt, mask, and snorkel.  Simulate in-water rescue breathing.

Whew, that’s a lot!  But you can get it all knocked out over two days, and still have time to take the students for a tour if you are organized and prepared.

Beginning of the day

You will need to prepare and bring some equipment for a successful weekend.  Bring with you the following:

  • The roster of students that are diving that day.
  • Their student record folders (and verify they are properly filled out)
  • An O2 kit
  • A first aid kit
  • A “save a dive” kit (spare gear, parts, and tools). I bring a spare BC, several pouches of soft weight, and a spare regulator on top of a normal save a dive kit.
  • Writing utensils
  • A dive slate properly prepared for the activities

Make sure the students know when and where you are meeting them.  Manatee springs has a limit on the number of divers that can dive in a given day, and we have been running into other groups as early as 7:30AM.  A backup plan to Manatee would be either Troy Springs (deep), or Fanning Springs, which is approximately 10 miles north of Manatee.  Please note, Fanning is barely 18’, so while you will meet the minimum depth standards…

You should endeavor to be at the site at least 10 minutes prior to the time you announced to the class.  As a scuba instructor you are a diving professional, act like one.

Some students will be there before you.  Some students will be there much later than you told them to be there.  This is just the way it is, think of it like herding cats.  You may have some success by telling students if they are not there by XX time they will not be able to dive, but that will not always work.

As you are waiting for the few late arrivals, you can use the time to go over the waiver reaffirmations with your students.  They are part of the NAUI student folder, and basically it is an opportunity for the student to re-attest that they are aware of the risks and wish to continue with the scuba training.

Site Briefing

Once you have collected all of the students and checked into the dive site, it is a good opportunity to give a broad site briefing.  Take the students on a walking tour of the dive site, giving a description of the site.  Briefly describe the depth of the site, and notable features such as entries and exits. During the tour, also discuss emergency procedures, spare gear, O2 locations, and an overview of the days events.

Some students will likely want to go to the restrooms upon arrival.  Maintaining control of the group is important, if you decide to let one or two wander off then others will wander off as well and eventually you will have lost control of the group.  If you decide to let the one or two people use the facilities, then go ahead and let EVERYONE use the facilities but give them a deadline on when to return – “there are the restrooms, everyone you MUST be back here in ten minutes so we can do our site briefing.”

At Manatee Springs I like to perform my site briefing in the following manner:

Gather the group in the parking lot, do a head count to make sure everyone is there, then tell them where we are and how many dives we will conduct.  I mention there are two sites, and then bring them to Catfish first.  On the walk over to Catfish I mention how many groups there will be, and talk about the order of the dives.  Once we arrive at Catfish I give a description of the sink, pointing out the duckweed surface and how it’s clear underneath (I save the “how to exit” part until the actual dive because the students will forget it anyway), but I do mention that the bottom is silty and I talk about the cave system.  I usually tell my students if I ever catch them in the cavern I will kick them out of the water and fail them, but I explain to them that this is for their own safety.  I also point out the shower right next to the deck.

I then take the students as a group to Manatee and continue the briefing there.  While walking over to Manatee I may discuss things like ticks, or mosquitoes, or Bubba’s depending on what I see around me.  Once at the head spring I make a point to discuss how strong the flow is, and how divers can be propelled from 25’ to 12’ very quickly and that it’s important to exhale; I usually tell them to “shout WHEEEEEE! At the top of your lungs!” as they are being pushed by the current.

After Manatee, I walk them over to the snack shack / concession area to show them where the restrooms are and point out they need to wash their feet before going in to use the facilities.  I usually comment that the rangers get upset when people track mud in there, and I don’t want to hear about UF students being the problem.  I also show them where to wash their booties/shoes.

And this is where I conclude my site briefing.  I will point out that they are now at the restrooms, and that we will regroup in the parking lot in 10 minutes to start gearing up and getting ready.

Pre-dive Briefing

Once the students have been split up, and we are ready to begin diving operations it is time to do a pre-dive briefing.  You should ALWAYS conduct a pre-dive briefing for every single dive, and you need to be very detailed during the briefing.  Make sure all of your students are there and paying attention during the briefing.

EVERY pre-dive briefing should include the following:

  • Entry and exit locations, as well as ascent and descent.
  • Establish the limits of the dive (every dive has three limits: depth, time, pressure).
  • Describe the bottom conditions – give them precautions for the environment (silt?)
  • On the first dive of the day review ALL signals you care about. Up, Down, OK, Uneasy, Ears, Pressure, Counting (I usually just have them show me their gauge), Out of Air, Buddy, Look, Follow, Hover, Stop, Slow Down, Speed Up, Low on Air, Turn-Around, Turn-Around based on limit (I use a T).  For every dive you should review any signals specific for the skills on the dive (different UF instructors have different signals for mask removal / replacement for example).
  • Before every dive, describe the skills/activities you will have them perform, and be very excruciating in the detail: “I will arrange you in a semi-circle around me, then will come up to you one by one and ask if you are OK. If you are, then I will hold on to your shoulder strap just to help control your buoyancy, and then I will ask you to partially flood your mask.  Remember, the spring water will be colder than the pool, so don’t let that startle you.  After you have cleared your mask, I will ask you to remove your mask and then clear it.  Once you are OK, I will then move on to the next person and repeat the process.  The rest of you, when I am working on the skills, you are to just sit there and watch us.”
  • Talk about any emergency contingencies; for instance, if you do not have a DM that can monitor the group in the event a student bolts on you, then you may choose to say something like “if I have to ascend to the surface for any reason, you all must come up too because you are uncertified divers and you can not be diving alone.”

Check their gear, and make sure they all have enough air for the dive.  You should never let a student begin a dive with less than 1500 psi, realistically probably not less than 2000 psi.

Conducting the dive

FILO!  First In, Last Out.  This statement is about YOU the instructor.  You should be the first person in the water, and you should be the last person out of the water.  If you are already in the water, you can assist students that are having problems as they enter, but if you are not in the water then you cannot render assistance.  I cannot count how many times I have had to grab a student and physically swim them back to a trail line in a swift current in the ocean, or had to stop a student from going diving solo.  Being in the water first makes these tasks easier.

The risk to FILO is that it’s possible that a student may have a problem on land (broken fin/mask strap, forgot weight belt, etc).  This is one reason why you should do a gear check of your students before getting into the water.  If you have an assistant, you can have them be the last one in the water so that they can help with these problems.

During any training dive, the most likely place for student / instructor separation is during the descent and ascent.  Invariably, especially in either rough seas, strong current, or cold water, there will be one student that has problems equalizing their ears.  I like to use a descent line to minimize this problem, I tell my students that we will descend down the line as a group; if one person has problems, we bring the entire group up.

If you are diving in the ocean with a strong current, it is a good idea to tell the students to hold onto the descent line, otherwise they will not be able to fight the current.  If any of them are not holding onto the line, grab their hand and put it on the line.   Do not be afraid to ask the mate on the boat to run a granny line to the bow for a controlled descent.

Once everyone is on the bottom it is time for the skill evaluation.  In Manatee, I usually arrange them in a semi-circle around me outside of the flow.  I will go to each student one by one, ask if they are OK, if they are then I will grab hold of their BC with my left hand and have them run through the skill sequence.  My right hand is usually holding onto my octo, or otherwise prepared to grab a regulator and shove it in their mouth in the event that something goes wrong.

If we are doing multiple skills, I will have each student do all of the skills before moving to the next.  If they struggle a little bit that is OK, they are probably not used to wearing wet suits and being in the cold spring water will feel different to them.  But obviously, don’t let them sit there struggling with a regulator recovery for 2 minutes before giving them a regulator to breathe.  Make sure to congratulate them for successful skills!  And don’t be afraid to ask them to repeat a skill you are unhappy with.

Remember, you are evaluating the students, not teaching them; there should be no reason for you to demonstrate any skills on the day of check-out dives.  If they could not display mastery of a skill in the confined water, then they should not be allowed to participate on a check-out dive.

I usually check all of the students air supply every couple of minutes.  Perhaps between every other student that you evaluate, i.e. evaluate student 1 & 2, check all air, evaluate 3 & 4, check all air, evaluate 5 & 6, check all air.  If someone is going through their air quickly, perhaps move to them sooner and then have the DM escort them to the surface when their air is low.

If you have an assistant with you, make sure to have them watch the entire group.  They can be behind the group ready to spring into action in the event they are needed.

If you do not have a DM your attention will be focused on the student that you are evaluating.  Try to keep an eye on the rest of the group peripherally, but realistically, if a student has their regulator out of their mouth or their mask off their face, you are 100% focused on them.  After completion of each skill look around to the rest of the group to see what they are doing, and make sure they are not getting into too much trouble.

If there is a problem and a student bolts, you MUST slow them down as much as possible and ensure they are exhaling to avoid harming themselves.  Seriously, punch them in the stomach to force them to exhale if you need to.  If you have a DM, he can collect the rest of the group and bring them to the surface.  If you don’t, well let’s hope you told all of your students that they need to ascend if you need to ascend in an emergency…

After the evaluation is over, check all of the students air supply, and if there is plenty left and you are still under the 20 minute mark, do a brief tour.  Eventually, regroup to the down line and begin your ascent as a group.  Make sure they are properly controlling their ascent rate, and not doing elevator rides on their way up.

Post-dive evaluation

I like to do a post-dive review on the surface while everything is fresh in my head.  For specific behavior that could be dangerous (elevator rides, for instance), I will go ahead and single the person out but make sure everyone understands why the behavior is risky.  For general issues, I will just speak about them to everyone.  Also highlight GOOD behavior and publicly praise.

Specific Skills

  • Mask Clear – I usually begin with a mask flood then a removal and replacement. You MUST be holding onto the student in case they bolt.
  • Regulator Recovery – I start with the sweep method then do the tank tilt/reach method. You MUST hold onto the student.  I usually hold onto my octo with my right hand in the event the student struggles with finding their reg and I need to shove a regulator in their mouth, and hold on to them with my left hand.
  • Weight belt removal – You should hold onto the student in the event they lose their weight belt.
  • Gear removal and replacement @ the surface – I usually do this as a surface interval between two dives. I start with having them take their fins off, then put them on, then their weight belt off, then put it on, then their BC off, then sit on top of it, then put their BC back on (they may need to deflate it a little), then finally the coup de gras is taking their mask off, and putting it back on.
  • Out of air share – Each person must be the donor and recipient. I usually have them get into the air share position, then ascend as a group.  Once they ascend, the donor orally inflates the BC of the out of air diver (thus combining two skills!).  We then stow the octopus, switch who will be out of air, descend, and do it again.  I usually use this skill as the last thing on the dive, so we will have already done the other skills then a tour, then I point to one person from each buddy pair and say “you are out of air”, etc.
  • CESA – The key here is controlled. They can ascend as fast as 40’ per minute during this skill, but they need to be in control. The student must ascend a distance of 15’ while exhaling a continuous breath of air, but they can only do the skill on one breath. You MUST give a very good briefing of this skill, and make sure they understand the skill.  You MUST perform this skill using a fixed down line so that you can arrest the ascent in the event of an emergency.  You should have one hand holding on to the down line, and one hand holding on to the student during this skill.  The student keeps the regulator in their mouth with their left hand on their BC inflator/deflator to control their ascent during this skill.  I usually hold onto them with my right hand, and give them a 3 second count down (3-2-1, UP!) with my left hand while resting the line in the crook of my left elbow.  When the student begins their ascent I position my left hand around the line ready to grab hold it to halt their ascent.  I always tell my students to get a good breath of air when I give them the UP signal then hum loudly on the ascent, but I rarely hear them if I am wearing a hood, so I have to also watch for bubbles as they exhale.  If they are not exhaling, I stop them.  If they take a breath, I stop them and make them go back to 15’ to repeat the skill.  I usually do this skill at the beginning or end of a dive, and leave the other students on the surface while I conduct the CESA individually with each student. You should never leave uncertified divers unattended on the bottom!
  • The are descriptions of the other skills in the NAUI S&P, also feel free to ask any of us, we will be more than happy to share.


Sample Schedule

I write out the dive’s and the skills I will have them do on my slate.  I also write out their names on the other side, this helps me with their names in the event I am diving another instructors students.   My slate looks something like this (text in RED is not written on the slate):

Day 1: Dives 1-3 (Local Springs)

Dive 1

Snorkel to down line

Mask clears

Regulator Recoveries

Weight Belt Removal & Replacement

Tour

Out of Air Share (both)


During the SIT we will go over logs and tables.  This allows us the chance to do their SAC rates as well as their letter groups.  Swap tanks.

Dive 2

CESA <- get it out of the way at the beginning, but your ears will be ringing after 8 of these…

Hovering / tour

Rescue (both) <- During the rescue I have them do a do-si-do tow for 50 yards

Surface Gear Removal

Cramp Releases

During the SIT we will stay in the water and do surface gear removal and replacement and cramp releases.

Dive 3

Hovering / Buddy System

Just do a tour dive.  They have had a busy day, let them relax.  The water level has been so high in Manatee that we’ve done some nice dives throughout the cypress knees in July.

After the dive, log all dives and activities over lunch as a group!

Day 2: Dives 4-5 (Keys)

Group control on Dive 4 & 5 is really critical.  We can have rough seas, poor visibility, and high current, so you need to make sure to follow FILO and give a very detailed pre-dive briefing before beginning each of these dives.  As part of that briefing, you should stress to your students that they need to stay with you as a group, that they should use the down line, and that they should monitor their air and let you know if they are running low.

Dive 4

Deep dive (40-60’).

Tour

Safety Stop


Dive 5

Compass Navigation Dive <– send them out on a heading (or natural navigation) for 10-15 kick cycles.


I usually then take them on a tour, then write the following in my wet-notes if I am comfortable with them, “congratulations, you have just passed.  You may go off with your buddy but be back here within X minutes or no less than Y psi.”  I adjust X and Y to the situation, such as their current air, how long we have been down.  I usually try to let them go for about 10 minutes, but not too much more than that.

Post dive, we will go grab lunch and fill out logbooks, handout c-cards.  Usually Mike K. is snarling about the logbooks.


Then it’s party time in the keys with the cookout…  Maybe if you’re lucky, someone will bake slutty brownies.


How to choose an instructor — my opinion

There is a very interesting thread on scubaboard titled “Choosing a cave instructor — my opinion.” Jim offers some valid questions you should ask your potential technical instructor. Here’s his list:

    1.How long has the instructor been an instructor?
    2.Ask about the experience of the instructor: is the instructor qualified to teach other advanced dive programs such as, deco procedures, advanced nitrox, trimix? Does the instructor have a wide variety of experience in varying dive environments?
    3.Does the instructor teach “On the Side” part-time or is s/he a full time instructor. Ask him/her why do they teach cave diving.
    4.Ask the instructor to explain the gear configurations s/he will require, and ask if there is any flexibility in the acceptable configuration. (In many cave instructors’ opinions, mine included there is more than one configuration that works. I call this DWsquared—Doing What Works.)
    5.Ask the instructor to explain the scope of the cave diver training s/he plans to provide for you. They should be able to explain the overall program goals as well as the details and day-by-day, dive-by-dive schedule of goals, and milestones in the training process.
    6.Ask the instructor about fees; make sure you understand ALL the fees. This includes books, certification materials, gas fills (Nitrox or air), park entrance fees, and gear rental fees such as tanks.
    7.Ask the instructor to give you suggestions on lodging.
    8.Ask the instructor which dive site(s) you will most likely dive in.
    9.Ask them about their training pipeline to become a cave instructor.

I think these are some good questions, and I would encourage anyone seeking technical and cave training to ask their potential instructor these questions. I would also encourage you to ask the following additional questions:

    1. What type of diving do you engage in for your recreational purposes?
    2. When was the last time you went cave/technical diving when you were not teaching/guiding? What were the details on the dive (site, duration, depth)?
    3. How frequently do you dive? How many non-teaching dives did you make within the previous twelve months?
    4. Have you ever been involved in exploration or research diving, and if so, when was the most recent activity?

Almost every instructor I have ever met got into this business because they were passionate and enthusiastic about the sport. They became instructors because they wanted to share their passion and love of the sport with others. But there is a reality that should be addressed, and that reality is that being an instructor can be hard work, and sadly some instructors have lost their fire. Those instructors rarely dive for fun anymore. When you do not regularly practice it, skills degrade. I firmly believe that if you do not regularly practice a skill, you probably can not teach it. And so in my opinion, anyone teaching cave and technical diving should regularly conduct non-teaching dives at their highest “rating” level.

I also believe that anyone teaching cave and technical diving should have at least some experience with exploration and/or research diving. I have heard some instructors claim they only teach “recreational cave diving,” which I believe is an oxymoron. While I realize many people are involved in cave diving for recreation, anytime you take a jump into a new passage you have never been in before, you are effectively exploring. And so you need to be well prepared for that experience.

I encourage anyone that is interested in taking a class with me to ask me the above questions, plus any additional ones that you may have.